Showing posts with label birthday. Show all posts

January 21, 2014

I Animal at Melbourne Zoo

One of the great benefits about working in a school is the fact that I get a really good amount of holidays, especially at this time of year when the students are all on summer holidays. Earlier on when I was trying to think of some things that I wanted to do over my holidays I looked up some websites to see what was happening in Melbourne over the summer. One thing that caught my eye was an event called I Animal hosted by Melbourne Zoo. I found out that it was an ongoing event, so I booked myself and a couple of my friends in to go the day before my birthday (which was on Sunday! Yay!)
We arrived at the zoo at 6.30pm to hand over our tickets and to pick up our iPod type device called Zoe. The tour started at exactly 7.00pm with Zoe talking about what it was like to be a child and how we saw the world (this was an ongoing theme through the event) and asking us all what we wanted to be when we grew up, which we had to say into the device. We also got to choose which animal we preferred out of elephants, giraffes and penguins. It's encouraged that you choose a different animal from your friends but we decided to stick together and chose the giraffe option.
We all started off with Zoe guiding us through the zoo, with groups of people breaking away to head off in different directions. For our group we were led by Zoe to see the lions first. Along the way she told us some pretty gory stories about some people who didn't fare so well against these beautiful creatures. The lions are always one of my favourite things to see at Melbourne Zoo, so I was really glad we got to see them that night.
Next we moved on to see a cute looking pig-like creature called the Peccary. Looks can be deceiving though as this creature has very long teeth and has been known to take on and win against jaguars in the wild. We did move on to see another animal (I can't remember the name) but unfortunately it wasn't in it's enclosure. I'm not sure why that was but it was probably the only disappointing thing about the night.
We then moved on past the baboon enclosure and on to see the zebras. These came out of a pen at the back of their enclosure for just a short while, but we still got to have a good look at them and had time to take a few photos.
And then finally we moved on to see the beautiful giraffes. They're one of my favourite animals, I always love to see them at the zoo. It looked like they'd just been fed before we got there so they were really close to the fence eating out of the baskets high up in the trees.
All of the different groups then came together and finished up near the carousel. We were told to take off our earphones only to hear our voices from the start of the tour, over the loud speakers saying what we wanted to be when we grew up. It was a really nice way to finish off, especially since we all got to act like kids just a little longer and got to have a ride on the carousel. Fun!
I really enjoyed the I Animal experience and thought the $39 it cost to do wasn't too bad a price, although it would have been nice to see a few more animals or maybe have a more hands on experience. Saying that though, I'm really curious to go back and see what the elephant and penguin tours were like. I've heard that the elephant one in particular can be very emotional. It's a really great idea to get more adults coming to the zoo, and I loved being there with only a small group of people and not with hundreds of other people around.

February 6, 2013

Lions and Tigers and Bears

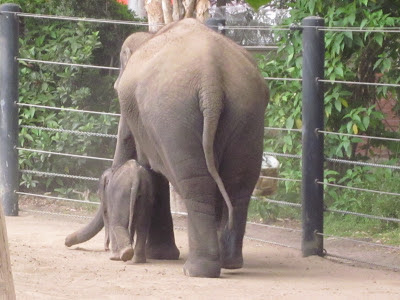
My gorgeous nephew L turned 2 on Australia Day and to celebrate we took him to the Melbourne Zoo for a picnic and to see the animals. It turned out to be extra special since a baby elephant had been born a week or so before that so we got to see him too.
What's a blog post without some elephant butt?!
A watching the giraffes. There was a cute zebra in with them too.
One of my favourite animals to see at the zoo has always been the lions. They were really funny to watch that day, like three guys hanging out. You can walk around their enclosure or go up on the walkway overlooking it. At first they were over near the walkway snoozing, two of them on their backs. Rude.
Later on they moved over to the other side of the pen and took it in turns to roar at each other.
And here are a few of the other animals we saw, the reptile enclosure seemed to be a favourite (not that I get the appeal). I must admit there was one very cute lizard in there (picture below) with what seemed like a lot of personality. 

After seeing a whole heap of animals we stopped in a grassy area where the zoo has twilight concerts and had our lunch and cake. My very creative sister made this awesome Lion cake - L's pick of course!
Happy Birthday Little L :) xo

February 1, 2012

Birthdays Galore

I'm not sure about you, but have you noticed that there's usually one time each year where there seems to be an overload of birthdays? December/January is definitely like this for me - both friends and family members celebrate their birthdays during this time - including me! My birthday is on the 19th (in case you were wondering ;) ) and somehow I managed to spread it out over a few days, what with me being disorganised and everyone not being available on the same day. On the night my sister and her family and my parents got pizza and my Mum made one of my favourite desserts - a beautiful lemon meringue pie.

This is a picture of me and my beautiful nephew Archie (his birthday was in December) and I love it. He was very excited about helping me blow out my candle!
And the beautiful bunch of flowers I got from a lady I work with. I also got another bunch which Archie chose, but unfortunately I forgot to take a picture before they wilted. :( They were very pretty though, and I was touched that he'd picked them out!
And what is a birthday without a funny tale to tell! I just know my mum is going to kill me for posting this picture but I just can't help myself. A few days before my birthday I found a beautiful cake that I asked my mum to make for me. The plan was to take it to the picnic all of my family and I were having, and the night before mum had the cake made and it looked very pretty - but the day of the picnic turned out to be very hot and so when we went to open the container to eat the cake this is what we found -
It still tasted delicious - but as one of my sister's joked this was probably 'what Martha wouldn't do'

As I mentioned in my last post, it was my gorgeous nephew Lenny's 1st birthday on Australia Day (January 26) and so of course his mum and I had plenty of baking to do! B was in charge of the most important thing of course - the birthday cake and (as the theme was of course Australia and Australian animals) she decided to make an echidna cake which, as you can see, turned out really well. How cute is it?!
I was in charge of the cupcakes and I made my usual red velvet cupcakes but attempted to make them look like koalas and echidnas. I couldn't find all the bits and pieces that I'd hoped to use to decorate the cupcakes with, but I think they turned out looking pretty cute.
The Koalas. I used cream cheese icing for the background, raspberry bullets for the noses, more cream cheese icing as well as mini choc chips for the eyes and mini pink marshmallows for the ears.
The Echidnas - Chocolate icing for the background, raspberry bullets for the nose, cream cheese icing and choc chips for the eyes and licorice for the spines.
This is the Australia shaped caramel lamington that I made. I had intended to make mini ones using a cookie cutter I found, but they weren't working out. I ended up printing off an A4 map of Australia and using it as a template to cut the cake out with. It's not quite the right shape - and of course Tasmania is way too big. But it looked very effective in real life - btw the Australian flag has been placed where we live.

I also had to share this with you! A friend of mine invited me out to a bar for her birthday this Friday just past. The bar was called The Croft Institute and had a medical theme with lots of medical tools and gadgets everywhere (there was even a hospital bed in the female toilets apparently). I ended up choosing to have a cocktail called Elixir which was served up in a glass and with a syringe acting as the straw! It was a novel way to serve a drink, and fit in very well with the medical theme of the bar.


January 20, 2012

Australia Day

Australia Day is coming up on the 26th of January and I've already started thinking about what I want to make for it. The main reason being, it's actually my beautiful nephew Lenny's 1st birthday that day. Which of course means an Australian themed BBQ party! I've found so many recipes that I want to try but I've been able to narrow it down a bit to the following sweet treats. Aren't they just so clever and cute?! I'll post the recipes once I've made them and let you know how they went.

Caramel Laminton from Not Quite Nigella
 Koala Cupcakes from Blempgorf
Echidna Cupcakes from Yahoo Food


November 24, 2011

Coconut Cake with Lemon Sour Cream Icing

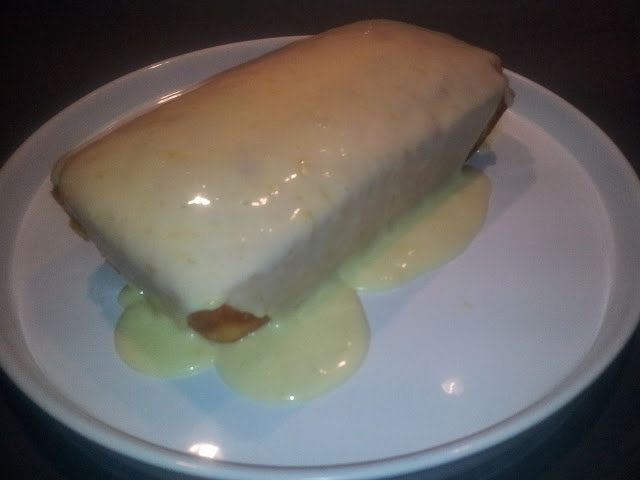
It was a colleagues birthday last week and as a treat I decided to make him a cake. I'd planned on making him a chocolate cake, since I remember him saying he loved that, in the past. However, when I mentioned 'mysteriously' to him a couple of days before that I had to make a cake for someone, he asked 'what kind?' to which I replied 'chocolate'. He thought for a moment before saying 'what about a coconut cake?' Now, I'd heard of making icing with coconut, or sprinkling it on top of a cake - but I've never actually had a coconut cake. I went to my safety net - Google - and was surprised to see how many cakes instantly came up. I decided on this Lemon Coconut Cake from Taste,  as it sounded simple enough, but I thought the lemon would add a bit more flavour. My colleague loved the cake by the way - well I assumed so by all the 'hmmm mmmm' noises he was making!

Ingredients:
125g butter, softened
1 cup caster sugar
1 large lemon, rind finely grated
2 eggs, lightly beaten
1 1/2 cups self-raising flour, sifted
1 cup milk
1/2 cup desiccated coconut

Method:
1. Preheat oven to 180°C. Grease a loaf pan and line base and sides with baking paper, allowing a little to overhang at both long ends.
2. Using an electric mixer, beat butter until light and fluffy. Add sugar, 1 tbsp at a time, beating until sugar is dissolved.

3. Add lemon rind and half the egg. Beat well. Add remaining egg and beat until well combined.
4. Using a large spoon, gently stir flour, milk and coconut into butter mixture.
5. Spoon mixture into prepared loaf pan. Smooth surface.
6. Bake for 50 minutes or until a skewer inserted into the centre comes out clean. Allow cake to cool a little in the pan before turning it out onto a wire rack to cool completely.
Lemon Icing:
1 1/2 cups icing sugar
1/4 cup sour cream
1 lemon, rind finely grated
1. Sift icing sugar into a bowl. Add sour cream and lemon rind. Stir until well combined. Pour icing over cake. Allow to set.
Recipe Source:
Taste website's Coconut Cake with Lemon Sour Cream Icing

Coconut Cake with Lemon Sour Cream Icing


Ingredients:
125g butter, softened
1 cup caster sugar
1 large lemon, rind finely grated
2 eggs, lightly beaten
1 1/2 cups self-raising flour, sifted
1 cup milk
1/2 cup desiccated coconut

Lemon sour cream icing:
1 1/2 cups icing sugar mixture
1/4 cup sour cream
1 lemon, rind finely grated

Method:

1. Preheat oven to 180°C. Grease a loaf pan and line base and sides with baking paper, allowing a little to overhang at both long ends.
2. Using an electric mixer, beat butter until light and fluffy. Add sugar, 1 tbsp at a time, beating until sugar is dissolved.
3. Add lemon rind and half the egg. Beat well. Add remaining egg and beat until well combined.
4.  Using a large metal spoon, gently stir flour, milk and coconut into butter mixture.
5. Spoon mixture into prepared loaf pan. Smooth surface.
6. Bake for 50 minutes or until a skewer inserted into the centre comes out clean. Allow cake to cool a little in the pan before turning it out onto a wire rack to cool completely.
7. Make lemon icing: Sift icing sugar into a bowl. Add sour cream and lemon rind. Stir until well combined. Pour icing over cake. Allow to set. Serve.

August 10, 2011

Milk & White Chocolate dipped Pretzels

While I was scrolling through and reading the entries on one of my favourite blogs, Cupcakes and Cashmere, recently I came across this idea of taking pretzel rods and dipping them into chocolate and sprinkles. It's a very simple concept that I'd never thought about before, but the result is a very effective and very tasty dessert. A while ago I tasted the pretzel M&M's, which were delicious, but I'd never thought of trying to recreate this effect until I saw this recipe. When I told people that I was going to make these chocolate dipped pretzels for my niece's 1st birthday I got a lot of odd looks and 'but pretzels with chocolate?!' comments, but despite the oddity, this combination actually does work! Trust me and try them. You won't regret it! :)
You will need pretzels that are bigger than usual. I had a bit of trouble finding large pretzel rods, but luckily the day before the birthday I managed to find some in a little deli. They probably weren't as big as I had imagined (or as the ones used on Cupcakes and Cashmere) but they did the job and still looked effective. I chose to use both milk and white chocolate to dip the pretzels in, just to have a couple of different options. I'm sure you could use dark chocolate, but I'm not a big fan personally, and plus it was enough work with the two chocolate. I melted the chocolate (seperately) by placing it in a saucepan and then placing that saucepan in a larger one half filled with boiling water over medium heat on the stove. Once the chocolate had melted I then dipped the tips of the pretzels into the chocolate.
I let the excess chocolate drip off the sticks and let the chocolate dry a touch so it wasn't so runny before I went on to the next step. I felt that if I rushed it and rolled the tips in the sprinkles too soon they would end up a little messier than I would have liked, and wouldn't have that nice round shape.
I had my various colours of sprinkles ready on plates before I started. I felt these colours suited the theme of the birthday party, which was a sort of garden tea theme, calling for more pastel colours. Here they are laid out on the plates.
So once the pretzels had been coated in chocolate (either milk or white) I then rolled the pretzel ends in the sprinkles until they were nicely covered.
Once I'd done this I found it was easiest to lay the finished pretzel sticks on a cake cooling rack to dry completely before I transferred them into a storage container. They ended up being a hit at the party though. The kids loved the bright colours and were attracted to these straight away (and they ate them all up) and the adults really liked the idea too, with the flavour combination of the salty with the sweet. They took a little bit of effort, as you could really only do a couple at a time, but they were definitely worth it in the end.
Recipe Source:
Found on Cupcakes and Cashmere
Chocolate-dipped Pretzels

February 10, 2011

Caramel Apple Cake

I bought a cookbook called 'Baked Explorations' by Matt Lewis and Renato Poliafito last year and have been meaning to try one the recipes in it. There's so many amazing looking things in there, but I just never got around to making any of them. The guys who wrote this book are also the co-owners of Brooklyn and Charleston, South Carolina bakery 'Baked' which I'm planning on visiting on my trip to New York later in the year.
It was my Mum's birthday recently and I decided to make her the Caramel Apple Cake from the cookbook. I thought it sounded like a delicious combination and the picture looked very effective and it was! The cake was moist and both it and the icing were delicious! The only downside was that it took quite a while to make (worth it though).
The cake usually has three parts to it (four for me!): the actual cake part, the caramel (and corn syrup for me), and the icing. The cake was really simple to make, however it turned out that I had only two cake tins that were the same size. This meant I had to make two of the cakes at the same time, then once they were out of the oven I was able to cook the third.
For the next step I had to make the corn syrup and the caramel and this is where I struggled.The corn syrup part was okay, although it was hard to tell when it was ready and how thick it should be as I've never cooked with corn syrup before. I was going so well with the caramel, turned my back for a second and when I turned back it had gone a little too dark. I was going to remake it but I needed more cream than I had in the fridge so I had to use what I had. 
Once I'd made the caramel I could make the icing. The caramel goes into the icing to give it it's flavour. I had to mix the icing for it to get a 'light and fluffy' constancy but I just couldn't get it! It seemed too runny to put on the cakes. The recipe told me that if this happened I should put the icing in the fridge for a period of time, then take it back out and mix it again but this didn't seem to work either. It turned out that I had a little bit of cream left over so I whipped that until it was thick and firm and then folded it into the icing. This did dull the flavour a little, but I was happy with the result because it took away the burnt flavour from the caramel and thickened the icing to the right consistency.  
Once I had all the parts of the cake ready I was able to assemble it, on my new platter I'd gotten from IKEA. It all went together quite nicely, although despite one side being straight the other side was on a bit of a lean. By the time I'd finished the icing had softened a little bit so I placed it straight in the fridge and took it out a couple of hours before serving, as recommended. This is a great tasting cake and despite taking a while to make, it's definitely one I plan on cooking again!


Recipe Source: 
'Baked Explorations' by Matt Lewis and Renato Poliafito

share post

Facebook